Using Synology NFS as external storage with Kubernetes
Posted on May 1, 2020 • 4 minutes • 828 words
For home usage, I highly recommend microk8s. It can be installed easily with snap. I’m not sure what’s the deal with snap for Ubuntu desktop users but I’ve only experience installing microk8s with it. And so far, it works well for the purpose.
Initially, I went with Docker Swarm because it’s so easy to setup but Docker Swarm feels like a hack. Also, it seems Swarm is already dead in the water. And since I’ve already been using Kubernetes at work for over 4 years, I finally settle down with microk8s. The other alternative is k3s didn’t work quite as expected as well but this should be for another post.
Setup a simple Kubernetes cluster
Setting Kubernetes is as simple as install microk8s on each host and another command to join them together. The process is very much simliar with Docker Swarm. Follow the guide on installing
and multi-node setup
on microk8s official website and you should be good to go.
Now, onto storage. I would like to have external storage so that it would be easy to backup my data. I already have my Synology setup and it comes with NFS so to keep my setup simple, I’m going to use Synology for that. I know it’s not the most secure thing but for homelab, this would do.
Please note that most the tutorial for Kubernetes will be outdated quickly. In this setup, I will be using Kubernetes v1.18.
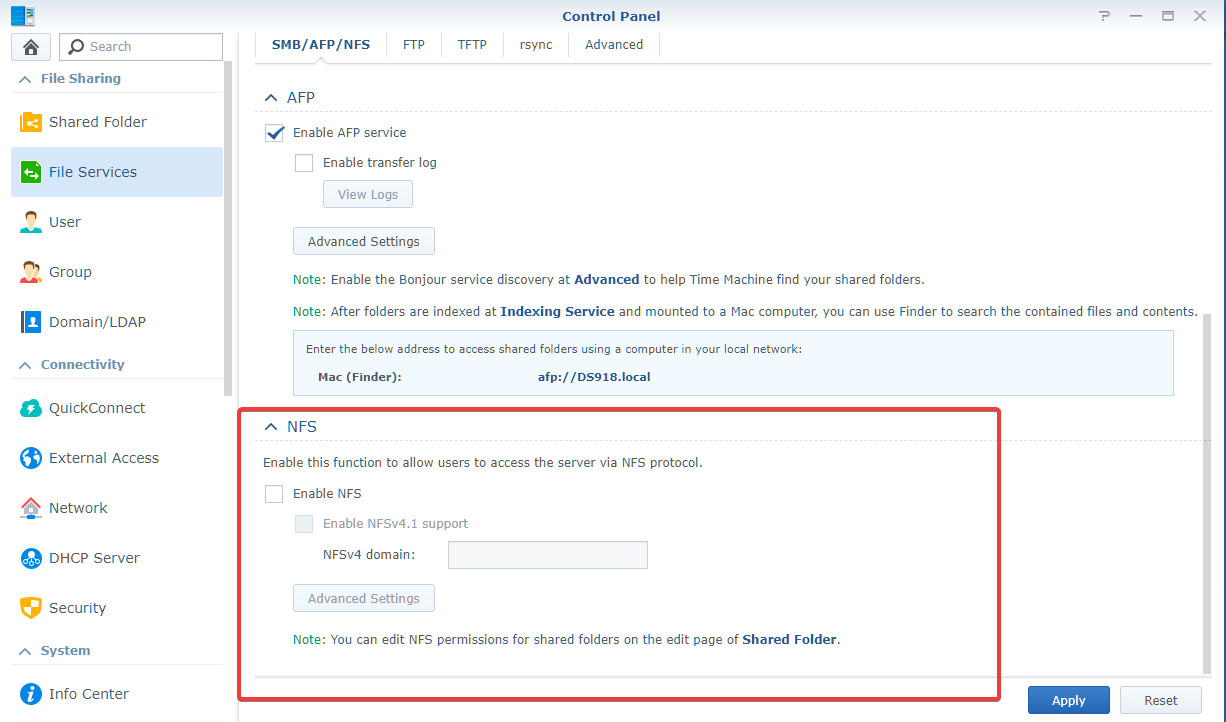
Step 0: Enable Synology NFS
Enable NFS from Control Panel -> File Services
Enable access for every node in the cluster in Shared Folder -> Edit -> NFS Permissions settings.
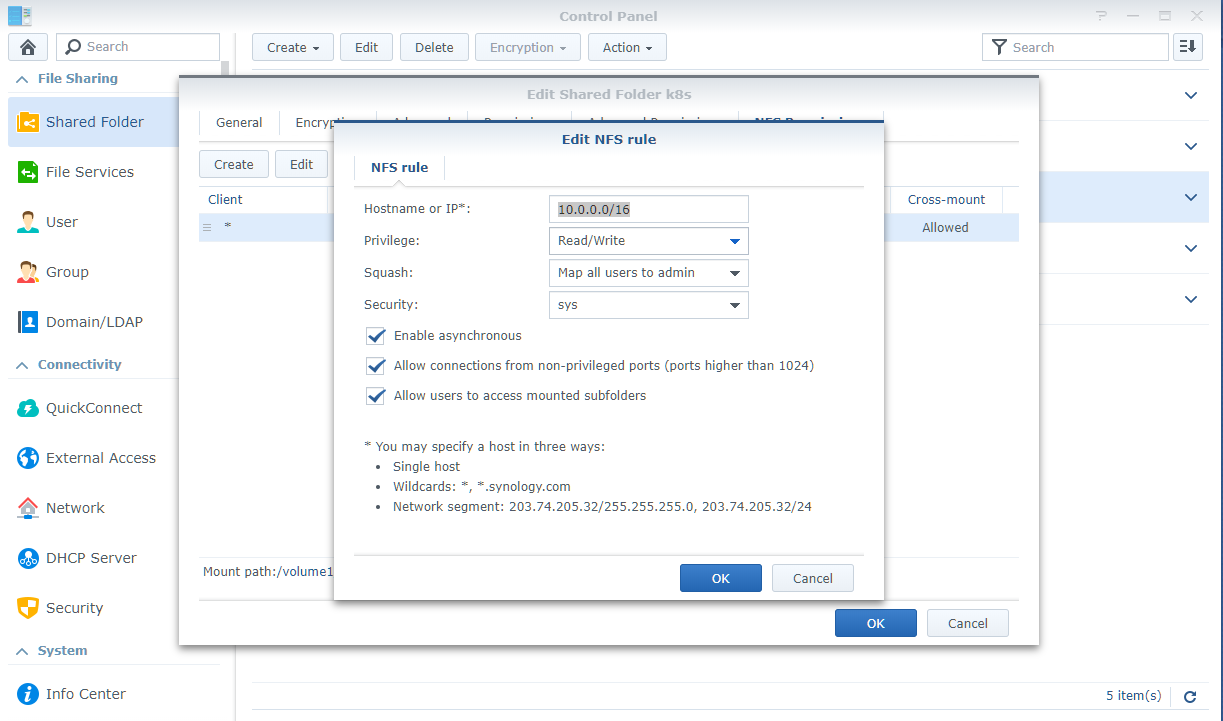
There’re few things to note here
- Because every nodes need to be able to mount the share folder as
rootso you need to selectNo mappingin theSquashdropdown ofNFS Permissions. - Check the
Allow connections from non-previleged portsalso.
With Helm
nfs-client external storage is provided as a chart over at kubernetes incubator
. With Helm, installing is as easy as
helm install stable/nfs-client-provisioner --set nfs.server=<SYNOLOGY_IP> --set nfs.path=/example/path
Without Helm
Step 1: Setup NFS client
You need to install nfs-common on every node.
sudo apt install nfs-common -y
Step 2: Deploy NFS provisioner
Replace SYNOLOGY_IP with your Synology IP address and VOLUME_PATH with NFS mount point on your Synology.
apiVersion: apps/v1
kind: Deployment
metadata:
  name: nfs-client-provisioner
  labels:
    app: nfs-client-provisioner
  # replace with namespace where provisioner is deployed
  namespace: default
spec:
  replicas: 1
  strategy:
    type: Recreate
  selector:
    matchLabels:
      app: nfs-client-provisioner
  template:
    metadata:
      labels:
        app: nfs-client-provisioner
    spec:
      serviceAccountName: nfs-client-provisioner
      containers:
        - name: nfs-client-provisioner
          image: quay.io/external_storage/nfs-client-provisioner:latest
          volumeMounts:
            - name: nfs-client-root
              mountPath: /persistentvolumes
          env:
            - name: PROVISIONER_NAME
              value: fuseim.pri/ifs
            - name: NFS_SERVER
              value: <SYNOLOGY_IP>
            - name: NFS_PATH
              value: <VOLUME_PATH>
      volumes:
        - name: nfs-client-root
          nfs:
            server: <SYNOLOGY_IP>
            path: <VOLUME_PATH>
Setup RBAC and storage class
apiVersion: v1
kind: ServiceAccount
metadata:
  name: nfs-client-provisioner
  # replace with namespace where provisioner is deployed
  namespace: default
---
kind: ClusterRole
apiVersion: rbac.authorization.k8s.io/v1
metadata:
  name: nfs-client-provisioner-runner
rules:
  - apiGroups: [""]
    resources: ["persistentvolumes"]
    verbs: ["get", "list", "watch", "create", "delete"]
  - apiGroups: [""]
    resources: ["persistentvolumeclaims"]
    verbs: ["get", "list", "watch", "update"]
  - apiGroups: ["storage.k8s.io"]
    resources: ["storageclasses"]
    verbs: ["get", "list", "watch"]
  - apiGroups: [""]
    resources: ["events"]
    verbs: ["create", "update", "patch"]
---
kind: ClusterRoleBinding
apiVersion: rbac.authorization.k8s.io/v1
metadata:
  name: run-nfs-client-provisioner
subjects:
  - kind: ServiceAccount
    name: nfs-client-provisioner
    # replace with namespace where provisioner is deployed
    namespace: default
roleRef:
  kind: ClusterRole
  name: nfs-client-provisioner-runner
  apiGroup: rbac.authorization.k8s.io
---
kind: Role
apiVersion: rbac.authorization.k8s.io/v1
metadata:
  name: leader-locking-nfs-client-provisioner
  # replace with namespace where provisioner is deployed
  namespace: default
rules:
  - apiGroups: [""]
    resources: ["endpoints"]
    verbs: ["get", "list", "watch", "create", "update", "patch"]
---
kind: RoleBinding
apiVersion: rbac.authorization.k8s.io/v1
metadata:
  name: leader-locking-nfs-client-provisioner
  # replace with namespace where provisioner is deployed
  namespace: default
subjects:
  - kind: ServiceAccount
    name: nfs-client-provisioner
    # replace with namespace where provisioner is deployed
    namespace: default
roleRef:
  kind: Role
  name: leader-locking-nfs-client-provisioner
  apiGroup: rbac.authorization.k8s.io
apiVersion: storage.k8s.io/v1
kind: StorageClass
metadata:
  name: managed-nfs-storage
provisioner: fuseim.pri/ifs # or choose another name, must match deployment's env PROVISIONER_NAME'
parameters:
  archiveOnDelete: "false"
  allowVolumeExpansion: "true"
  reclaimPolicy: "Delete"
Step 3: Set NFS as the new default storage class
Set nfs-storage as the default storage class instead of the default rook-ceph-block.
kubectl patch storageclass rook-ceph-block -p '{"metadata": {"annotations":{"storageclass.kubernetes.io/is-default-class":"false"}}}'
kubectl patch storageclass managed-nfs-storage -p '{"metadata": {"annotations":{"storageclass.kubernetes.io/is-default-class":"true"}}}'
Testing
We will create a simple pod and pvc to test. Create test-pod.yaml and test-claim.yaml that looks like this in a test folder
kind: Pod
apiVersion: v1
metadata:
  name: test-pod
spec:
  containers:
  - name: test-pod
    image: gcr.io/google_containers/busybox:1.24
    command:
      - "/bin/sh"
    args:
      - "-c"
      - "touch /mnt/SUCCESS && exit 0 || exit 1"
    volumeMounts:
      - name: nfs-pvc
        mountPath: "/mnt"
  restartPolicy: "Never"
  volumes:
    - name: nfs-pvc
      persistentVolumeClaim:
        claimName: test-claim
and test-claim.yaml
kind: PersistentVolumeClaim
apiVersion: v1
metadata:
  name: test-claim
  annotations:
    volume.beta.kubernetes.io/storage-class: "nfs-client" # nfs-client is default value of helm chart, change accordingly
spec:
  accessModes:
    - ReadWriteMany
  resources:
    requests:
      storage: 1Mi
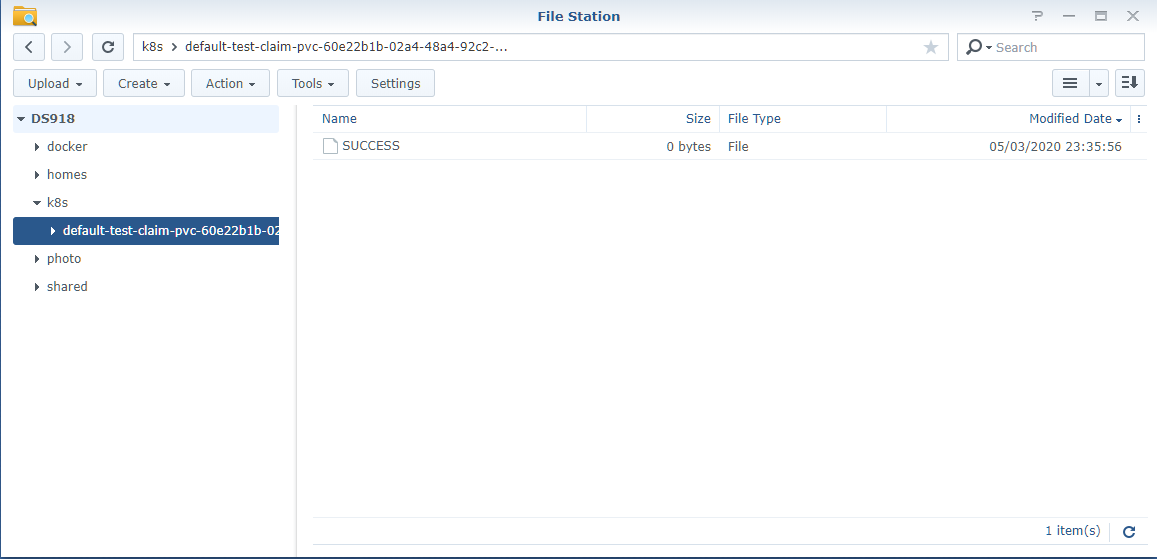
And do kubectl create -f test/. You should see the PVC bounded and pod completed after awhile. Browse the NFS share and if you see a folder is created with a SUCCESS file inside, everything is working as expected.